-
Repairing a rotten Mk1 roof
Thought some might find this useful, this is also going to appear in one of the classic car mags as a "how to" as the car is owned by a mag journo.
Anyway i feel that rot is the number one killer of our cars, this more than anything is going to despatch them in their hundreds as solid repair sections run out. So finding a cheap and sustainable repair method is vital.
Aside from the usual rear arches, sills and chassis members (all well known areas) , i am seeing more and more Mk1s with terminal roof rot, so bad around the top windscreen edge that it makes the car uneconomical to repair, in fact i've seen 3 cars this year scrapped for this very reason that would otherwise survive another day.
The car in question i am repairing is an average Mk1, with good arches, sills and not too bad everywhere else, but with a totally rotten top screen/roof section. I tried for months to find a good roof from a breaker to "simply" weld that part in, but after contacting all the usual sources i just simply couldn't get a good roof edge. That concerns me, it means the death of many a Mk1. If untreated this area allows lots of water ingress that not only delaminates the windscreen but compounds the rot issues further by taking out the door pillars and floor pans..... really not good.
So i've repaired Mk1 roof sections this way a number of times in the past, but thought now would be a good time to document it so that others know what they are up against and hopefully safe a few cars in the process.
This is the section of roof in question, the screen has already been professionally removed and the rotten section of roof cut out.... you can see how rotten the inside edge was, simply filling that with bodge or fibreglass is not an option.

You can see we at least have a solid bottom edge, for the purpose of this guide i am going to assume everyone at least has this, if this is rotten too then it really is time to assess the whole car as a viable project.

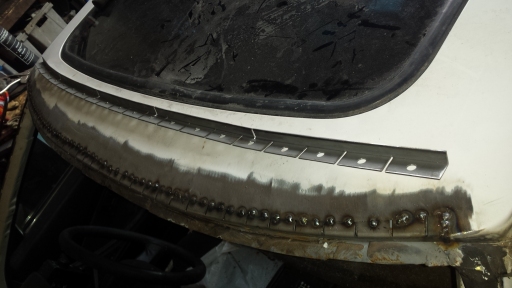
The first step is to buy some 20mm angle 1.2mm thick and make slices in one edge every 20mm or so, this will let you contour the top edge around the roof. The second problem is the roof not only contours in this direction, it also has a left to right rise, so 4 or 5 vertical slices are needed in the front face to allow the repair section to bend both ways.
Careful tacking needed while keeping the outer edge in line with the lower panel to ensure the roof edge is not lost. Do not seam weld any of this, it will distort the roof so badly you will need to use a ton of filler to get it right, we will only be using the filler as a cosmetic final layer.

As you can see this has only been tacked to the upper edge, not the lower, we will be making another repair section for the lower half.

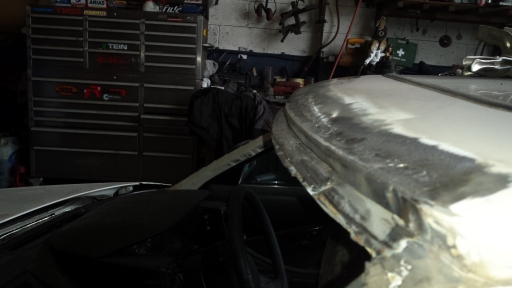
Here you can see the nice sweeping radius of the roof is back to how it should be.

The next stage is to make a lower repair section, using 10mm angle, 1.2mm thick, this is again sliced along one edge and given intermediate slices on the other edge, then drilled for spot welding. This will tuck behind the vertical edge of the section we just welded in.
With this lower section welded in, the upper slices are welded through to the lower repair and all welds ground flat, i use a 40 grit flappy disc for this as it has much more control than a grinding disc.

That is the structural side taken care of, the roof is now 100% solid, and probably stronger than it was originally as the vertical face is now double skinned.
Now to make it cosmetically right, if you've taken time with the welding it should only require the bare minimum of filler.
My first skim, probably only 1 or 2mm thick.

This is sanded back with a bodyfile and 80 grit to reveal any high or low spots...

A second skim then takes care of any remaining problem areas, now it may take you 3 or 4 skims to get it right, i've been doing this all my working life, so i'm awesome :)

After final sanding, you don't need to use finer grades, if you use a 4+1 high build primer (must be gun applied, aerosols are no good for a repair like this) it will take out all of the 80 grit scratches with 2 or 3 coats, it really is fantastic stuff.

One totally repaired roof, and it cost £20 in steel and a days work.
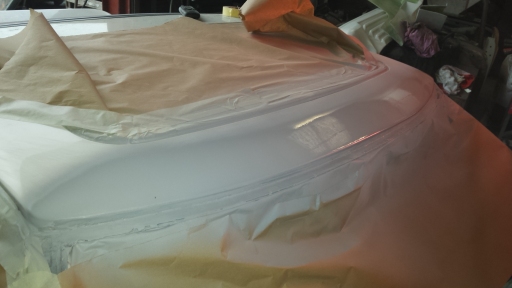
This just requires wet flatting with 240 then 800, then 1500 grade before painting, it is also a good idea to waxoyl the inside of the repair from the cabin to prevent the welded repairs causing a future problem.
Hopefully someone will use this guide to save their Mk1.
 TB Quote of the month:"I split my ear open whilst masturbating" - Jasper Full story Here
-
Cool guide and this is what's happening to my silver mk1, windscreen is de laminating and water is peeing in, but as you say this is the point were you think do I save this or scrap it.
-
Beautiful work sir. I shall remember this technique. Thanks!
-
Very useful info as always! :thumbsup:
-
Not sure how you figured out such an elegant solution but that is quite impressive.
I guess the same principle could be employed for other areas on a car body where you need strength and the ability to keep a uniform curve like that.
You should do this for a living; you're pretty good.
:)
-
Thankyou sir, yes i've used the same technique on rusty wheel arches, slicing angle and forming it around curves works really well for that too.
TB Quote of the month:"I split my ear open whilst masturbating" - Jasper Full story Here
 Posting Permissions
- You may not post new threads
- You may not post replies
- You may not post attachments
- You may not edit your posts
-
Forum Rules


 Reply With Quote