-


MrT's twist on P.O.C.V.I.P.S mod
Ok folks. thought I would do a DIY guide for anyone wishing to attempt the POCVIPS mod themselves..
firstly credit where credit due, Thanx to Paul Woods for originally pioneering the mod..
for anyone that does not know what this mod is for, well, once you swap in a 3vzfe into your mk2, they have a tendency to occasionally stall when you come to s top at a junction.. won't happen everytime, but some occasions it will do it pretty much every time you slow down to stop, dip the clutch and revs drop below 500 rpm, then car cuts out,
I started researching the reasons into stalling, and found on some american sites, the engine even stalls when in the camry.. causes are mainly carbon build up in the ISCV, or egr valve stuck, or engine coolant temp sensor faulty..
now on my engine I have removed the egr, so no point worrying about that, coolant sensor seems fine so only other thing left is ISCV ..
here is Pauls original thread to give you some background on the mod..
http://www.twobrutal.co.uk/forum/sho...hlight=Pocvips
Ok so if you've read through Paul's mod you will know , the great Mr Woods, cured the stalling issue by putting a weld on the side of the ISCV plunger, which keeps the valve from shutting completely and hence the car will no longer stall..
Now I have no access to a welder of any sorts so I ruled out putting a weld on the unit in my car, so I have resolved it in a slightly different manner, and thought you chaps would like to know..
right then, I can be slightly impatient at times, so I just hurried through the procedure, and didn't take any pics, so for the purpose of this DIY, I have borrowed pics from dstlaurents post on Toyotanation.. and Pauls thread
so here we go..
Disclaimer: I take no resposibility for anyone fecking the car up by following my guide.. do your own research and decide yourself wether and how to do the job, also make sure you work on a sensible table so you don't lose and bits from the valve.. DO AT YOUR OWN RISK..
now thats out the way
tools required,
large pliers,
12 mm socket and ratchet or ring spanner
medium size philips screwdriver
small flat head screwdriver
sewing machine oil or greese
1x m4 spring washer (my adition to the mod)
firstly locate your ISCV on your 3vzfe..
here it is for reference,..

now make sure you do this while the car is cold as there is a coolant line that connects to the ISCV and I wouldnt want you to burn yourself..
so this pic shows you the ISCV outlined in red and coolant line is highlighted in blue..

dissconnect the black pipe that goes from the ISCV to just behind the airflow meter.
and the coolant line, both highlighted.

now reach underneath and dissconect the wiring/connecter just under the ISCV

now grab your ratchet and 12mm socket and undo the 2 bolts that hold the ISCV on the inlet plenum

once you have removed both 12mm bolts, gently pull the ISCV away from the plenum,don't lose the gasket that sits between the valave and plenum, and you will see 2x vacuum lines attached below the valve, dissconnect these too.. u will need to use the pliers on the spring clips holding them on the valve.
this should then let you remove the valave from the car, and you will be left with this..

and this is the ISCV

now take the valve indoors and find a bench or table to work on..
grab your philips screwdriver and under the 3 screws that hold the valve together

now gently prise the metal part away from the valve to expose the metal plunger, then take a old tooth brush and wd40, clean the plunger, and the inside of teh metal case, also the back of the valve casing too.. basically both items in these pics..

and

now we come to the fidly bit and my twist on the mod..
you can see in the plunger pic above where Paul put a weld on the side of the plunger,
my mods slightly different..
take a small flat screwdriver and gently prise the plastic cap off the back of the ISCV. now be careful when doing this as firstly you will have 3 metal spacers fall out, these basically go where you removed the 3 philips screws before..
secondly once you prise the cap off , you will have 2 washers drop out, 1 is a normal flat washer and 1 is slightly springy.
once you have the plastic cap of this will expose the rotor, and this is what you will have before you..

now gently rotate the rotor anticlockwise and remove it from the shaft..
you will find rotating the rotor one way the plunger gets pulled up/open, and rotating the other way pushes the plunger back out to shut the valve.
once you have removed the plunger this is what you will see..
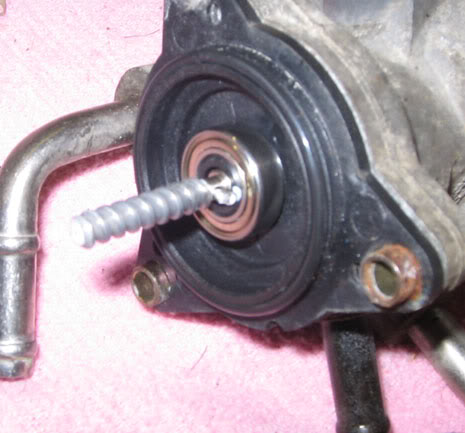
use sewing machine oil or greese on the this twisted/screw part of the shaft..
now if you gently push the plunger up you will see the screw side of the shaft move up a little, and you can see it has 1 flat side to the shaft seen in this pic..
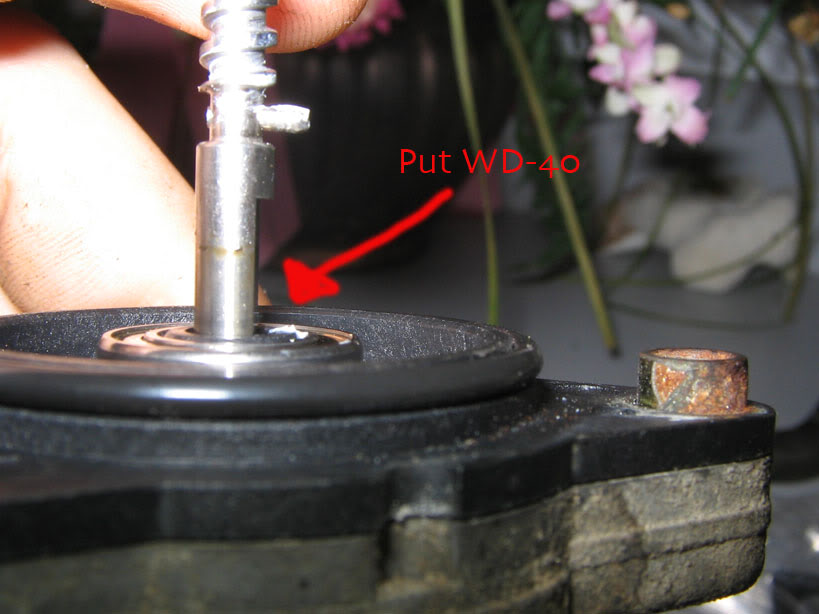
DO NOT USE WD40 ON THIS.. even tho it says in the pic..
wd40 is a penetrant and will remove and greese already in the bearings and will eventually make them seeze, use some greese here or sewing machine oil..
and this is where the mod part comes in..
get your m4 spring washer.. one of these things..
http://www.ebay.co.uk/itm/M3-M4-M5-M...item483eebf972
put it on the spiral side of the shaft and bring it to just below the rest pin that stops the shaft from going completely through the unit..
you might have to split the washer slightly to get it past the pin, once I got it past the pin, I used my pliers to squeeze the washer together, basically overlapping the open ends on the washer above each other, making sure the overlapped ends stay on the flat side of the shaft,
this will stop the washer from moving..
now I tested the valve by pushing the shaft up and down to see if the washer would fall out, but it stays nice and put.. and now
I put the plunger side back into the metal case to see where the plunger goes out to..
and it sits just like this flush with the end of the case as Paul describes it should after the mod..

now that you are happy how the plunger is sat, its time to put the whole thing back together.. so back to the spiral shaft, pop some grease or oil on the spirals, and gently screw the rotor back on, then put the bearing back on top, pop the spring washer on and put the flat washer ontop of that, then gently put the black plastic cap back on the rotor, realign and join the unit together.. pop the 3 screws back in place and screw the unit back together..
and in the end if its worked correctly you should have the ISCV looking back as it was when you started..
kinda like so..
ok so now go back and fit it back to the car.. and once you have done that, I pulled the efi fuse to reset the ecu, refit the fuse and start the car...
the first time you turn the key the car might struggle to start.. try again and it starts.. you migh find idle is really low and the car possibly even cust out, mine did it a few times.. but after I started and restarted the car about 4 or 5 times, she now starts perfectly each time and idles perfectly at 900rpm.. the proof of the pudding will be when I take the car for a spin tomorrow..
and there you have it folks. a slightly different version to the famous POCVIPS..
MrT logging off.
Last edited by mrT; 19-02-2012 at 16:11.
-
Fantastic work sir, that is actually a neater solution than the blob of weld method. They both do exactly the same thing, stopping the ISCV from shutting, but your way is better, once i'd cured the stall i stopped looking at other ways the valve could be kept open.
Perfect :thumbsup:
 TB Quote of the month:"I split my ear open whilst masturbating" - Jasper Full story Here
-
nice work..thread stickied :thumbsup:
-
Thanx for the thumbsup chaps.. will try and do more DIY guides..
Perhaps on build number 2 I might do a complete step by step documentary..lol
 Posting Permissions
- You may not post new threads
- You may not post replies
- You may not post attachments
- You may not edit your posts
-
Forum Rules


 Reply With Quote


